오늘은 Cache에 대해 알아보려고 한다.
변동되지 않는 Data를 많은 사용자가 조회할 경우 모든 요청마다 DB에 조회 하는게 과연 올바른 방식일까?
게다가 slow query일 경우 사용자의 대기시간은 더욱 길어지며, Connection pool의 순환도 쉽지 않을 것이다.
cache를 통해 이러한 상황을 해결해보자!
💡 Cache ?
Cache는 DB 조회 시 출력된 결과 값을 메모리 혹은 디스크에 보관하고 있다가 재호출시 DB 조회를 하지 않고 메모리에 있는 결과값을 그대로 제공해준다.
이러한 특성 때문에, Cache는 주로 반복적으로 동일한 결과값을 제공해주거나, 각 작업의 시간이 오래걸리거나 서버에 부하를 주는 경우 보통 사용한다.
실제 프로젝트를 하는 사례가 아니기 때문에 Redis같은 Nosql기반의 캐시서버를 띄우기보단, Spring Cache의 대표격 라이브러리인 Ehcache를 사용해고자 한다. (추후에는 Redis를 띄워보며 장단점 비교해보자)
자자 바로 시작해보자.

먼저 프로젝트를 생성 후 gradle 의존설정을 해준다.
build.gradle
plugins {
	id 'org.springframework.boot' version '2.6.3'
	id 'io.spring.dependency-management' version '1.0.11.RELEASE'
	id 'java'
}

group = 'com.example'
version = '0.0.1-SNAPSHOT'
sourceCompatibility = '11'

configurations {
	compileOnly {
		extendsFrom annotationProcessor
	}
}

repositories {
	mavenCentral()
}

dependencies {
	implementation group: 'net.sf.ehcache', name: 'ehcache', version: '2.10.6'
	implementation group: 'org.springframework.boot', name: 'spring-boot-starter-cache', version: '2.6.3'
	implementation 'org.springframework.boot:spring-boot-starter-web'
	compileOnly 'org.projectlombok:lombok'
	annotationProcessor 'org.projectlombok:lombok'
	testImplementation 'org.springframework.boot:spring-boot-starter-test'
}

tasks.named('test') {
	useJUnitPlatform()
}
여기서 spring-boot-starter-cache는 캐시관련 설정을 편리하게 지원해주는 패키지이다.
spring-boot-starter-cache는 기본 CacheManager로 ConcurrentHashMap을 사용하고 있지만 Ehcache 2.x 의 의존성을 추가시켜주면 자동으로 변경된다. EHcache를 사용할 것이니 의존성을 넣어 변경시켜준다.
spring-boot-starter-cache 패키지를 통해 아래와 같은 소스의 CacheManager, EhCacheManagerFactoryBean 등의 Bean 생성을 개발자가 직접 안해도 된다.
만약 spring-boot-starter-cache 패키지를 안쓸거면 아래처럼 ConfigBean 생성을 해주면 된다.
@Configuration
@EnableCaching
public classEhCacheConfig{

	@Bean
	publicEhCacheManagerFactoryBean ehCacheManagerFactoryBean() {
		EhCacheManagerFactoryBean ehCacheManagerFactoryBean = new EhCacheManagerFactoryBean();
		ehCacheManagerFactoryBean.setConfigLocation(new ClassPathResource("ehcache-config.xml"));
		ehCacheManagerFactoryBean.setShared(true);
		return ehCacheManagerFactoryBean;
	}

	@Bean
	publicEhCacheCacheManager ehCacheCacheManager(EhCacheManagerFactoryBean ehCacheManagerFactoryBean) {
		EhCacheCacheManager ehCacheCacheManager = new EhCacheCacheManager();
		ehCacheCacheManager.setCacheManager(ehCacheManagerFactoryBean.getObject());
		return ehCacheCacheManager;
	}
}
ehcache.xml
<?xml version="1.0" encoding="UTF-8"?>
<ehcache xmlns:xsi="http://www.w3.org/2001/XMLSchema-instance"
    xsi:noNamespaceSchemaLocation="http://ehcache.org/ehcache.xsd"
    updateCheck="false">
    <diskStore path="java.io.tmpdir" />

    <cache name="findUserInfoCache"
           maxEntriesLocalHeap="10000"
           maxEntriesLocalDisk="1000"
           eternal="false"
           diskSpoolBufferSizeMB="20"
           timeToIdleSeconds="300" timeToLiveSeconds="600"
           memoryStoreEvictionPolicy="LFU"
           transactionalMode="off">
        <persistence strategy="localTempSwap" />
    </cache>

</ehcache>
위와 같이 ehache.xml 을 작성해준다. 해당 파일의 위치는 src/main/resources 밑에 위치시키면된다.
아래의 표를 보면서 셋팅을 커스터마이징해주면 된다.
| name | 코드에서 사용할 캐시 name | 필수 |
| maxEntriesLocalHeap | 메모리에 생성 될 최대 캐시 갯수 | 0 |
| maxEntriesLocalDisk | 디스크에 생성 될 최대 캐시 갯수 | 0 |
| eternal | 영속성 캐시 설정 (지워지는 캐시인지?) external = "true"이면, timeToIdleSecond, timeToLiveSeconds 설정이 무시됨 |
false |
| timeToIdleSecond | 해당 초동안 캐시가 호출 되지 않으면 삭제 | 0 |
| timeToLiveSeconds | 해당 초가 지나면 캐시가 삭제 | 0 |
| overflowToDisk | 오버플로우 된 항목에 대해 disk에 저장할 지 여부 | false |
| diskPersistent | 캐시를 disk에 저장하여, 서버 로드 시 캐시를 말아 둘지 설정 | false |
| diskExpiryThreadIntervalSeconds | Disk Expiry 스레드의 작업 수행 간격 설정 | 0 |
| memoryStoreEvictionPolicy | 캐시의 객체 수가 maxEntriesLocalHeap에 도달하면, 객체를 추가하고 제거하는 정책 설정 LRU : 가장 오랫동안 호출 되지 않은 캐시를 삭제 LFU : 호출 빈도가 가장 적은 캐시를 삭제 FIFO : First In First Out, 캐시가 생성된 순서대로 가장 오래된 캐시를 삭제 |
LRU |
그럼 테스트를 해보기 위해 간단한 서비스를 만들어 보자!
1. main
@SpringBootApplication
@EnableCaching
public class CacheApplication {

	public static void main(String[] args) {
		SpringApplication.run(CacheApplication.class, args);
	}

}
@EnableCaching 이라는 어노테이션만으로 캐시사용을 설정해줄 수 있다.
2. Repository
@Repository
public class UserRepository {

    private static Logger logger = LoggerFactory.getLogger(UserRepository.class);


    public UserVO findByNameNoCache(String name) {
        slowQuery(2000);
        return new UserVO(name+"@naver.com", name);
    }


    @Cacheable(value="findUserInfoCache", key="#name")
    public UserVO findByNameCache(String name) {
        slowQuery(2000);
        return new UserVO(name+ "@naver.com", name);
    }


    @CacheEvict(value = "findUserInfoCache", key="#name")
    public void refresh(String name) {
        logger.info(name + "의 Cache Clear!");
    }

    private void slowQuery(long seconds) {
        try {
            Thread.sleep(seconds);
        } catch (InterruptedException e) {
            throw new IllegalStateException(e);
        }
    }
}
캐시 미사용 메소드
캐시 사용 메소드
캐시 초기화 메소드
SlowQuery를 돌린다는 가정하에 Thread sleep 메소드
4개의 메소드를 작성해준다.
3. Controller
@RestController
public class UserController {
	private static Logger logger = LoggerFactory.getLogger(UserController.class);

	@Resource
	UserRepository userRepo;

	@GetMapping("/user/nocache/{name}")
	public UserVO getNoCacheUser(@PathVariable String name) {

		long start = System.currentTimeMillis();
		UserVO userVO = userRepo.findByNameNoCache(name);
		long end = System.currentTimeMillis();

		logger.info("NoCache 수행시간 : " + Long.toString(end - start));

		return userVO;
	}

	@GetMapping("/user/cache/{name}")
	public UserVO getCacheUserVO(@PathVariable String name) {

		long start = System.currentTimeMillis();
		UserVO UserVO = userRepo.findByNameCache(name);
		long end = System.currentTimeMillis();

		logger.info("Cache 수행시간 : " + Long.toString(end - start));

		return UserVO;
	}

	@GetMapping("/user/refresh/{name}")
	public String refresh(@PathVariable String name) {
		userRepo.refresh(name); // 캐시제거
		return "cache clear!";
	}

}
4. VO
@Getter
@Setter
@ToString
public class UserVO implements Serializable {
	public UserVO(String email, String name) {
		this.email = email;
		this.name = name;
	}
	public UserVO() {

	}

    private String email;

    private String name;
}
위와 같이 서비스를 만들어서 바로 Jmeter로 Call test를 진행해보자.

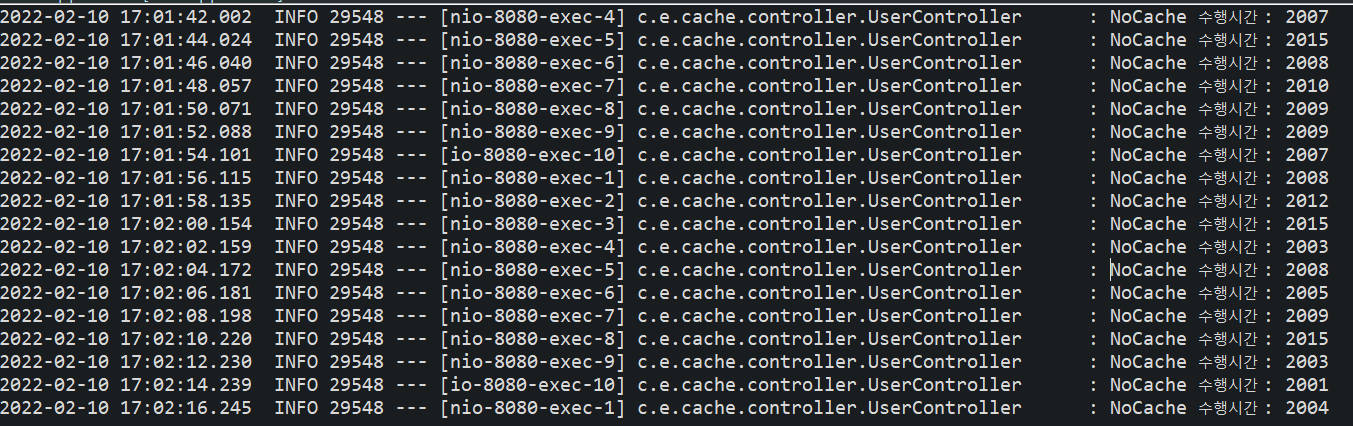
초당 1개의 요청을 30회 반복해서 보내는 설정을 통해 테스트를 진행했다.
- 캐시 미사용

- 캐시 사용

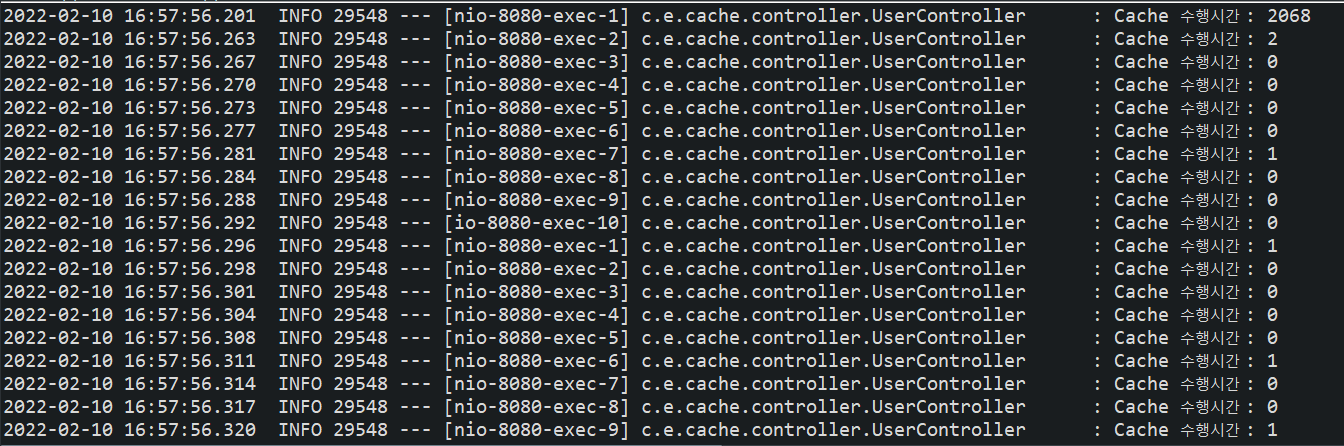
확연한 퍼포먼스의 차이를 확인해 볼 수 있다.
결론
캐시를 통해 불필요한 DB의 접근을 제어하고 결과 값을 반환해줄 수 있었다. 이는 SlowQuery나 값이 변경될 일이 없는 데이터에 주로 사용되며, SpringBoot에서는 Ehcache를 대표격으로 사용하고 있다. 간단한 의존성 추가 및 config, 어노테이션등을 통해 캐시를 제어해줄 수 있으며 손쉽게 높은 퍼포먼스를 보여주었다. 추후에는 Redis를 사용해보며, 구체적인 장단점과 어떤 상황에 어떤 캐시서비스를 사용하는게 더 적합한지 araboja.
끗!
참고
'Framework > 🍃Spring' 카테고리의 다른 글
| JPA - 플러시(Flush)란? (2) | 2022.12.01 |
|---|---|
| JPA - 영속성 컨텍스트란? (0) | 2022.11.25 |
| Spring cloud를 통해 MSA 구현해보기 - 3탄 Eureka, API Gateway를 통한 서버사이드 서비스 디스커버리 패턴 구현 (0) | 2022.02.08 |
| Spring cloud를 통해 MSA 구현해보기 - 2탄 Eureka를 통한 클라이언트 사이드 서비스 디스커버리 패턴 구현 (0) | 2022.01.19 |
| Spring cloud를 통해 MSA 구현해보기 - 1탄 MSA란 무엇인가? (0) | 2022.01.13 |


댓글